I am going to show you how to get started with Essbase using our Amazon Images. Using the AMI, I am able to have a fully installed EPM machine with Shared Services, Essbase, Administration Services, Integration Services, Provider Services, BI Services and UI Services in 15 mins. Not that you would EVER want to run all of those on the same machine!
So lets get started
Prerequisites
- Get an Amazon AWS account here
- Followed these instructions and have your AWS Access Key, Secret AWS Access Key and “pem” files handy.
- Installed Putty (download here). I recommend using the Windows installer to install all the putty components. Or use a mac — :) X11 and ssh are built in
- Install Xming from here (optional, you will need this if you want to use the GUI config utility)
- You may have to install Java, get it here
- Sign up for the Basic Edition of Cube Flex here (limited number of invitations available) or sign up for the Professional or Enterprise Edition and you wont need the rest of this guide :)
Getting Started
Download the Amazon Tools from here. Unzip and copy the folder to ‘C:\Program Files’, Rename the folder to ec2-api-tools.
Run the following in a command window to set the environment up, Generate security keys and start an instance of the Full 360 Essbase/EPM AMI.
> set PATH=C:\Program Files\ec2-api-tools\bin;%PATH%
> set JAVA_HOME=C:\Program Files\Java\jre1.6.0_07
> set EC2_CERT=c:\ec2\cert-XXXXXX.pem
> set EC2_PRIVATE_KEY=c:\ec2\pk-XXXXXX.pem
# Setup the keys
> cd ec2 C:\>ec2-add-keypair.cmd f360-keypair > "C:\ec2\f360-keypair" # List the Full 360 images (our amazon owner id is 073631148609
> ec2-describe-images -o 073631148609
IMAGE ami-2fdc3846 cubeflex.full360.com/pub/essbase-32bit/oracle-epm-9.3.1.v01.manifest.xml 073631148609 available public 9A5AAF61 i386 machine # We are now ready to start an instance
# using the AMI id returned by the above command (ami-xxxxx)
> ec2-run-instances ami-2edc3847 -k f360-keypair RESERVATION r-14d1037d 073631148609 default INSTANCE i-c845e6a1 ami-2edc3847 pending f360-keypair 0 m1.small 2008-09-29T01:30:13+0000 us-east-1bIf you see this error : Client.AuthFailure: Subscription to ProductCode 9A5AAF61 required. That indicates that you have not subscribed to the AMI via amazon. Please sign up here
We can now query the status of the machine start up, if everything is looking good, the result will show that the INSTANCE is running:
> ec2-describe-instances
RESERVATION r-14d1037d 073631148609 default INSTANCE i-c845e6a1 ami-2edc3847 ec2-67-202-63-237.compute-1.amazonaws.com domU-12-31-38-00-9D-E1.compute-1.internal running f360-keypair 0 m1.small 2008-09-29T01:30:13+0000 us-east-1b
Woohoo! We are now ready to connect and use the instance! But before that we need to open a port thru Amazon’s security to allow us to connect via Putty/SSH.
>ec2-authorize default -p 22 GROUP default PERMISSION default ALLOWS tcp 22 22 FROM CIDR 0.0.0.0/0Copy the f360-keypair to f360-keypair-putty, open the file in notepad and delete the first line that starts with KEYPAIR, save the file
Open c:\ec2\ in windows explorer
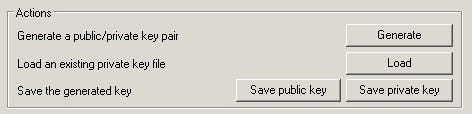
Right click on the f360-keypair file, and select open. Choose Puttygen from the Putty installation in C:\Program Files
You should see the following dialog box, Click ok
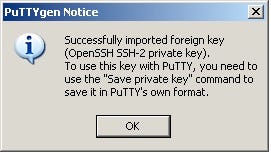
Click on Save Private Key, this saves a Putty format of the private key
Lets connect to the machine!
Open Putty, and in Session > host name field set the hostname from ec2-describe instances — it would be something like ec2-XX-XXX-XX-XXX.compute-1.amazonaws.com:
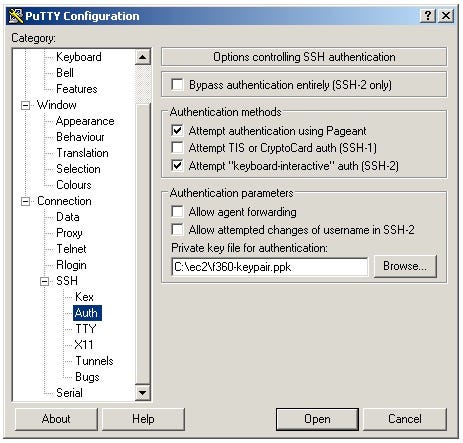
In the Connection > SSH >Auth menu, choose the ppk file that we just saved:
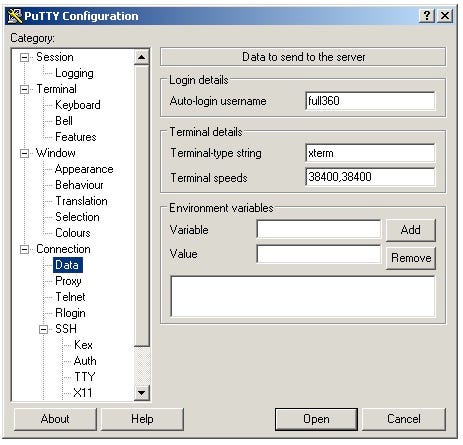
In the Connection > Data section set the username to be full360
Now go back to the Session Menu, type in cubeFlex in the Saved Sessions box, and click Save:
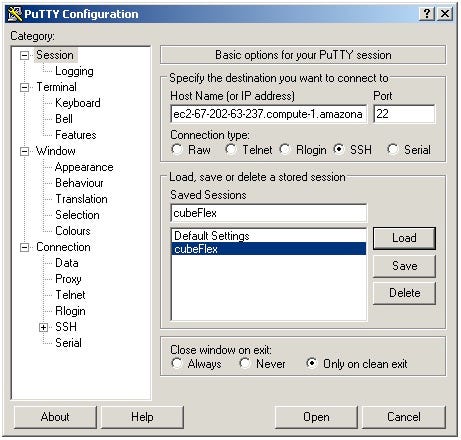
Now Click Open, which should connect you to your instance.
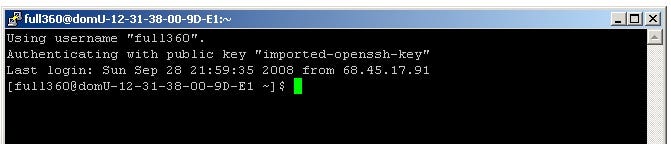
If you are successfully connected, we need to upload YOUR certificate files (currently in c:\ec2) up to the instance, so go back to the NT command window and run the following. It uses the saved putty session (cubeFlex) to establish the connection:
>"c:\Program Files\PuTTY\psftp" -load cubeFlex
Using username "full360".
Remote working directory is /home/full360
psftp> cd .ec2
Remote directory is now /home/full360/.ec2
psftp> lcd c:\ec2
New local directory is C:\ec2
psftp> put cert.pem local:cert.pem => remote:/home/full360/.ec2/cert.pem psftp>
put pk.pem local:pk.pem => remote:/home/full360/.ec2/pk.pem
psftp> quit
We are almost done! Go back to the putty session so we can run setup.sh, you can open this file and take a look, by
default it will install Shared Services and Essbase, if you’d like to install anything else, just turn on the appropriate flag
$ cp setup.sh.full360 setup.sh
$ ./setup.sh
To configure the installation
[[email protected] ~]$ su - oracle -bash-3.00$ cd /f360/hyperion/common/config -bash-3.00$ ./configtool.sh -consoleit change user to oracle and go to the hyperion home directory and run configtool.sh -console If you’d like to use the java gui, Naren written a post on how to connect Xming to an EC2 instance
To shutdown the machine:
C:\ec2>ec2-terminate-instances i-c845e6a1Appendix: Setup Log
creating and attaching volume
instance ID is i-c845e6a1
availability zone is us-east-1b
creating new volume sized 5 GB
Status of vol-610ce908: available
ec2attvol vol-610ce908 -i i-c845e6a1 -d /dev/sdi
ATTACHMENT      vol-610ce908    i-c845e6a1      /dev/sdi        attaching      2008-09-29T02:13:55+0000
Status of vol-610ce908 : attached
meta-data=/dev/sdi               isize=256    agcount=8, agsize=163840 blks
=                       sectsz=512
data     =                       bsize=4096   blocks=1310720, imaxpct=25
=                       sunit=0      swidth=0 blks, unwritten=1
naming   =version 2              bsize=4096
log      =internal log           bsize=4096   blocks=2560, version=1
=                       sectsz=512   sunit=0 blks
realtime =none                   extsz=65536  blocks=0, rtextents=0
creating and attaching volume
instance ID is i-c845e6a1
availability zone is us-east-1b
creating new volume sized 10 GB
Status of vol-600ce909: available
ec2attvol vol-600ce909 -i i-c845e6a1 -d /dev/sdh
ATTACHMENT      vol-600ce909    i-c845e6a1      /dev/sdh        attaching      2008-09-29T02:14:33+0000
Status of vol-600ce909 : attached
meta-data=/dev/sdh               isize=256    agcount=16, agsize=163840 blks
=                       sectsz=512
data     =                       bsize=4096   blocks=2621440, imaxpct=25
=                       sunit=0      swidth=0 blks, unwritten=1
naming   =version 2              bsize=4096
log      =internal log           bsize=4096   blocks=2560, version=1
=                       sectsz=512   sunit=0 blks
realtime =none                   extsz=65536  blocks=0, rtextents=0
Enabling Oracle
Fixing old hostname domU-12-31-38-00-A4-A2 for Oracle Ora Files in /usr/lib/oracle/xe/app/oracle/product/10.2.0/server with correct hostname domU-12-31-38-00-9D-E1
Starting Oracle Net Listener.
Starting Oracle Database 10g Express Edition Instance.
LSNRCTL for Linux: Version 10.2.0.1.0 - Production on 28-SEP-2008 22:14:56
Copyright (c) 1991, 2005, Oracle.  All rights reserved.
Connecting to (DESCRIPTION=(ADDRESS=(PROTOCOL=IPC)(KEY=EXTPROC_FOR_XE)))
STATUS of the LISTENER
------------------------
Alias                     LISTENER
Version                   TNSLSNR for Linux: Version 10.2.0.1.0 - Production
Start Date                28-SEP-2008 22:14:43
Uptime                    0 days 0 hr. 0 min. 13 sec
Trace Level               off
Security                  ON: Local OS Authentication
SNMP                      OFF
Default Service           XE
Listener Parameter File   /usr/lib/oracle/xe/app/oracle/product/10.2.0/server/network/admin/listener.ora
Listener Log File         /usr/lib/oracle/xe/app/oracle/product/10.2.0/server/network/log/listener.log
Listening Endpoints Summary...
(DESCRIPTION=(ADDRESS=(PROTOCOL=ipc)(KEY=EXTPROC_FOR_XE)))
(DESCRIPTION=(ADDRESS=(PROTOCOL=tcp)(HOST=domU-12-31-38-00-9D-E1.compute-1.internal)(PORT=1521)))
Services Summary...
Service "PLSExtProc" has 1 instance(s).
Instance "PLSExtProc", status UNKNOWN, has 1 handler(s) for this service...
Service "XE" has 1 instance(s).
Instance "XE", status READY, has 1 handler(s) for this service...
Service "XEXDB" has 1 instance(s).
Instance "XE", status READY, has 1 handler(s) for this service...
Service "XE_XPT" has 1 instance(s).
Instance "XE", status READY, has 1 handler(s) for this service...
The command completed successfully
Installing SharedServices
Resolving s3.amazonaws.com... 72.21.211.161
Connecting to s3.amazonaws.com|72.21.211.161|:80... connected.
HTTP request sent, awaiting response... 200 OK
Length: 248,386,185 (237M) [application/x-gzip]
100%[====================================>] 248,386,185   10.06M/s    ETA 00:00
22:15:33 (6.55 MB/s) - `/f360/installs/oracle_epm/9.3.1/SharedServices.tgz' saved [248386185/248386185]
SharedServices/
SharedServices/setup.jar
SharedServices/setup.bin
SharedServices/setup.sp
/bin/su -s /bin/bash oracle -c /mnt/SharedServices/setup.bin -options /mnt/init/response/SharedServices_install.txt -silent
Setting firewall configuration for Shared Services
Successfully Installed SharedServices
applying LDAP patch
Successfully applied LDAP patch
Installing ESSBASE
Resolving s3.amazonaws.com... 72.21.207.193
Connecting to s3.amazonaws.com|72.21.207.193|:80... connected.
HTTP request sent, awaiting response... 200 OK
Length: 193,609,216 (185M) [application/x-gzip]
100%[====================================>] 193,609,216   10.14M/s    ETA 00:00
22:16:59 (9.90 MB/s) - `/f360/installs/oracle_epm/9.3.1/ESSBASE.tgz' saved [193609216/193609216]
ESSBASE/
ESSBASE/setup.jar
ESSBASE/setup.bin
ESSBASE/media.inf
/bin/su -s /bin/bash oracle -c /mnt/ESSBASE/setup.bin -options /mnt/init/response/ESSBASE_install.txt -silent
Setting firewall configuration for ESSBASE
Successfully Installed ESSBASE
Not Installing EPS
Not Installing EAS
Not Installing EIS
Not Installing BIS
Not Installing UIS
save Firewall config
Setup Script Done!
Originally published at full360.com on September 27, 2008.